
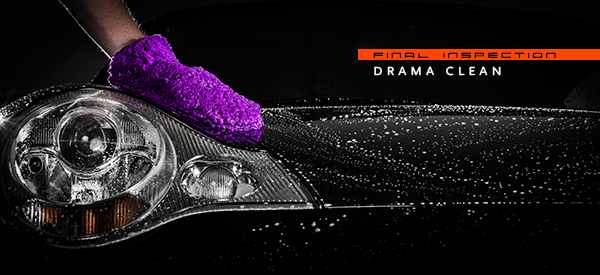
Drama Clean
This article was originally written in 2010 and has been imported from 2 older websites and refreshed a half dozen times, it's the most important article we have, so we revisit it regularly. We mention this because you may find older version of products being used. The same basic method is still current though. Enjoy.
In 2009 we were selling buckets called Wash Tubes, we set out to make a custom grit separator for it. We also sourced a foam gun. We wondered how much these items were adding to the quality of a wash and conducted quite a serious round of tests spanning months and found buckets and foam were actually INCREASING DAMAGE. We were shocked and made our findings public on our (now defunct) forum, Detail Addiction (you can ask to join the new Detail Addiction Facebook group here if you're a Final Inspection customer).
This started us on creating the 'ZERO bucket method' which is more about the entire process than the fact it doesn't utilise buckets, but it's a catchy name.
PRODUCTS
1. Paint Pampering Body Shampoo.
The best washing gel, mainly for its low SLS (sodium lauryth sulphates) , low foam, high lubrication (minimises marring) formula and very reasonable price.

2. A NanoFibre Wash Mitt for bodywork and another for wheels.
No matter how well you wash your wheel mitt, some abrasive particles from brake pad compound may remain, always keep them separate, I mark one for wheels with a 'W' on the cuff with a permanent marker.
3. A High Pressure water unit.
At about 250-1000psi, it's much better to remove loose debris than mains pressure which is usually only about 80psi.
Just be careful not to put the lance too close to any surface of your pride and joy.
A high pressure unit, used correctly is very safe and much better than water with mains pressure.
4. Wheel Clean
Another outstanding product for its ridiculously effortless cleaning power and its super safe formula. PWC will deliver a good clean without the need for scrubbing (for wheels that aren't very heavily soiled) and with a little assistance from a wheel brush for heavily caked wheels, the results are nothing short of stunning from very little effort. PWC is perfectly safe on any type of wheel, coated or not and is gentle on brake calliper paint also.
5. Glass System
This two NanoFibre cloth system works great, there is almost never a time when a glass cleaner is required.

6. Full Metal Jacket Spray Wax
Protection after washing, whether it be a top-up wax or the first coat is so important. A product that makes this easy and a product that doesn't require force is important. Full Metal Jacket Spray Wax (FMJSW) meets all the criteria and offers the ability to be applied to all plastics, chrome and glass as well as paint.
A must. Everyone with a car should own at least one Final Inspection NanoFibre Paintwork cloth.
The fastest, safest and easiest way to dry your car (or mini drying towel for your compact or motorbike) after washes.
THE PROCESS
WHEELS
There are a three methods we recommend for cleaning wheels, but the first is our recommendation for regular weekly cleaning. Method #2 is recommend if you're having to avoid touching the wheels with your hands and for very lightly soiled wheels and Method #3 is for best results which we'd recommend 3-6 monthly.Prior to a detail is may be necessary to remove your wheels to access the insides and brake calipers properly, depending on your wheel style.
Always start with wheels first, always start with dry, cool wheels (if possible allow them to cool, if not, force cool them with cold water), the reason for applying chemical to dry, cool wheels is to allow the wheel cleaner to stick to the wheel surfaces and dwell, this is efficient, you can use an aggressive cleaner, or you can allow a much more gentle cleaner to work for a longer time, both achieve the same result but the latter option is safer. Our 'Wheel Clean' is a good compromise between a safe cleaner for all types of mass-produced wheels and brakes including carbon ceramic rotors. It's very lightly acidic (as acidic as a tomato) and it loves to cling to surfaces for extra long dwelling times, so it's VERY efficient.
1. Apply Wheel Clean to your wheels, and by the time you've covered all four, the first has had enough dwelling time (about 2-5 minutes). Do not allow any chemical to dry on a surface.
2. Agitate the chemical with a Wash Mitt, we highly recommend to apply a protective glove before the wash mitt to protect your skin from the chemical and brake dust. You can also use a brush if it helps cleaning the insides of the wheel and to reach between the caliper and the wheel if you have large brakes with little clearance. The other recommendation is to drive the car forward to rotate the wheels 180 degrees so the wheel surface that was closest to the caliper is now opposite and free to clean. This can avoid the need for a wheel brush.
3. Apply a citrus degreaser such as 'Jaffa' to your tyres (and your wheel arches if necessary).
4. Rinse clean your wheel, tyres (and wheel arches) clean
Theory
This video explains the theory behind the wash process that Final Inspection detailers, proven to work over thousands of cars and 10+ years of professional detailing.
Step 1 – Initial Rinse
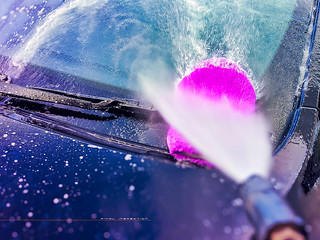
High Pressure (recommended) your vehicle from top to bottom removing all loose debris. Spend as long as you have to, making sure you remove as much muck as possible as this is a completely non-abrasive method of removing dirt from your surfaces. High-pressure hoses actually use very little water, so go for it. If your car is warm from a recent drive or you've moved it out of the sun and the panels or wheels are hot, its important to cool them down with water.
Do not wash hot panels and do not wash in direct sunlight. Why? Because water can evaporate VERY quickly from a hot surface and the residual can etch watermarks into your clear coat as well as plastics, correction of these is time consuming and/or costly, some plastics can be permanently damaged. Foaming a car is a big no-no for this reason, never let any chemical sit on a surface longer than it has to for any reason, especially paintwork.
Step 2 – Cleaning Wheels, Tyres & Wheel Arches
It's a good idea to regularly clean your Wheel Arches, you could apply a little Jaffa to them (even the carpeted arches) and allow it to dwell for a few minutes, agitating with a brush for better results.
Spray Jaffa onto your tyres to remove build up of old tyre dressing. Agitate with a brush if necessary.

Spray wheel clean onto wheels and agitate if necessary.
Rinse wheel arches first, then tyres, then wheels making sure all products do not have the chance to dry on the surfaces.
Step 3 – Pre-Rinse Technique -Optional
Spray 2-4 pumps of paint pampering body shampoo onto each panel of your vehicle.
Allow to dwell, but not dry.
Rinse your body shampoo off the vehicle starting from the top down.
This is the pre-rinse method and ensures more of the dirt on the vehicles exterior surfaces is removed. The pre-rinse will remove more dirt than clean water only. The body shampoo breaks-down and encapsulates the debris and the rinse removes it. Mechanical action from a wash mitt is required, but the less debris you are removing with a mitt (in the next step), the less chance there is for marring to occur as it is pushed along the surface. Do not use a foam and do not let the chemical sit on the surface for too long.
Swirls are caused when abrasives are moved across the surface, reducing the amount of these abrasives on the surface prior to washing reduces the degree of damage.
Every time you wash your car, you will be causing damage to your paint. It is impossible not to cause micro scratches and on dark colours they appear sooner than on light colours, it is however very good practice to make sure you have ample lubricants between your washing medium (wash mitt) and paint surface. For more info be sure to listen to Damian's explanation in the video at the bottom of this article.
Step 4 – Body Washing
Make sure your wash mitt is clean. If it isn't, spray the mitt with water from your high-pressure hose to clean it out. We usually place the mitt under a windshield wiper arm to stop it flying away whilst I rinse all the debris out of it from the last wash.
After the mitt is clean, rinse the area to remove the particles from the mitt you've just dislodged.
This practice removes the requirement for a bucket and actually cleans the mitt far, far better than attempting to remove the dirt from the mitt by hand in a bucket of water. The Final Inspection wash mitt is built so well it will happily be washed with high-pressure thousands of times without losing fibres or structural integrity. Again, this is explained in detail in the Damian's video at the bottom of this article.
So, this method improves speed, reduces water waste, lowers cost and most importantly, minimises marring to the surfaces as the mitt is cleaner. Less debris in the mitt = less debris moving around inducing swirls. We washed a test panel 100 times and took copious amounts of gloss readings before and after and proved this method to work better than any bucket rinsing system.
Using no buckets also reduces shampoo cost as you're applying paint pampering body shampoo directly to your mitt. Lubrication is increased as a result (your body shampoo isn't diluted in a bucket full of water) and cleaning power is increased.
Spray 2-4 pumps of Body Shampoo onto your wash mitt and wash a panel from top to bottom with slightly overlapping strokes in a grid pattern, not circular.
With an efficient body shampoo, you don’t have to wipe the same area of the surface more than once and doing so is unnecessary, slightly over-lapping grid is efficient and circular motions aren't and will result in more agitation of the debris on the surface.
Continue to wash every panel from top to bottom checking the mitt regularly. When the mitt has an amount of dirt build-up you consider to be unacceptable, rinse it out with the method above, re-apply your body shampoo and continue on the next panel.
If at any stage it appears body shampoo is drying on the car, rinse those sections immediately and continue the wash process. You can rest your mitt anywhere whilst you rinse the sections with drying shampoo.

Step 5 – Final Rinse, Drying and Protection
Rinse the car removing all traces of body shampoo and dry with a NanoFibre Drying Towel as soon as possible after rinsing, a wet surface collects dirt much faster than a dry surface and you don't want to be pushing around dirt now that your car has no lubrication in the drying step.
This is one of the reasons why drying as quickly as possible is a plus and the drying towel does this best, nothing dries faster (or safer) than a waffled weave NanoFibre product, the drying towel is designed to scoop up liquid as quickly and efficiently as possible and the mammoth size of the large version does this so well.
Although you rarely will need to, the large waffle weave can be a little difficult to wring out when fully loaded with water and can weigh quite a bit also. This is where the 'mini' waffle weave drying towel comes in handy, it is slightly slower at water pick-up and you may have to wring it out once or twice, but it is perfect for smaller vehicles and much easier to handle.
This is where glass should be cleaned, use your glass system at this point.
Once clean and dry, apply protection. We recommend spraying Full Metal Jacket Spray Wax directly to the vehicle and buffing with a NanoFibre Paintwork cloth, immediately, one panel at a time. This is your weekly top-up of protection and will assist you with a faster, easier and safer wash next week!
Conclusion
So there you have it, all you need and nothing you don't, the very best weekly maintenance technique proven effective with our decades of years of experience full time professional detailing, car washing and car care product manufacturing.
The process above costs approximately $2-$5 and requires 10-45 minutes to complete and is the best way to avoid having to see a detailer more often than you should.
Enjoy that weekend wash :)
Comments
4 comments
Peter Jacobs
Hi Damien, the Range Rover Autobiography that you coated has long since gone. The quality of the car was so bad and after numerous (17 to be exact) component failures I had to get rid of it. On the positive side, I have ordered a new Mercedes S560 due to be delivered in October. See you soon after for you to work your magic on it. Peter Jacobs 0413 443 660
Robert
Amazing. I’ve just stumbled on this and it is so useful thanks for making it.
Cleaning and inspection in Wake Forest
This will help me keep all my equipment maintained for a lot longer than usual, thank you for sharing this. We are using these tips on daily bases. these are practical tips for us. Thanks.
Cleaning and inspection in Wake Forest
George
Dear Final Inspection Team,
Your article was very helpful. I have just purchased a GLC43 and I like keeping in a pristine condition and enjoy cleaning and detailing it. I have two questions.
Firstly do you have a bundle package for all the products you mentioned in your article that I can purchase? Also do you offer a tutorial on how to use them other than the YouTube video?
Secondly, when would you recommend the new car protection service you offer to be done on a new car? I’ve had the car for about a month now.
I look forward to your feedback.
George